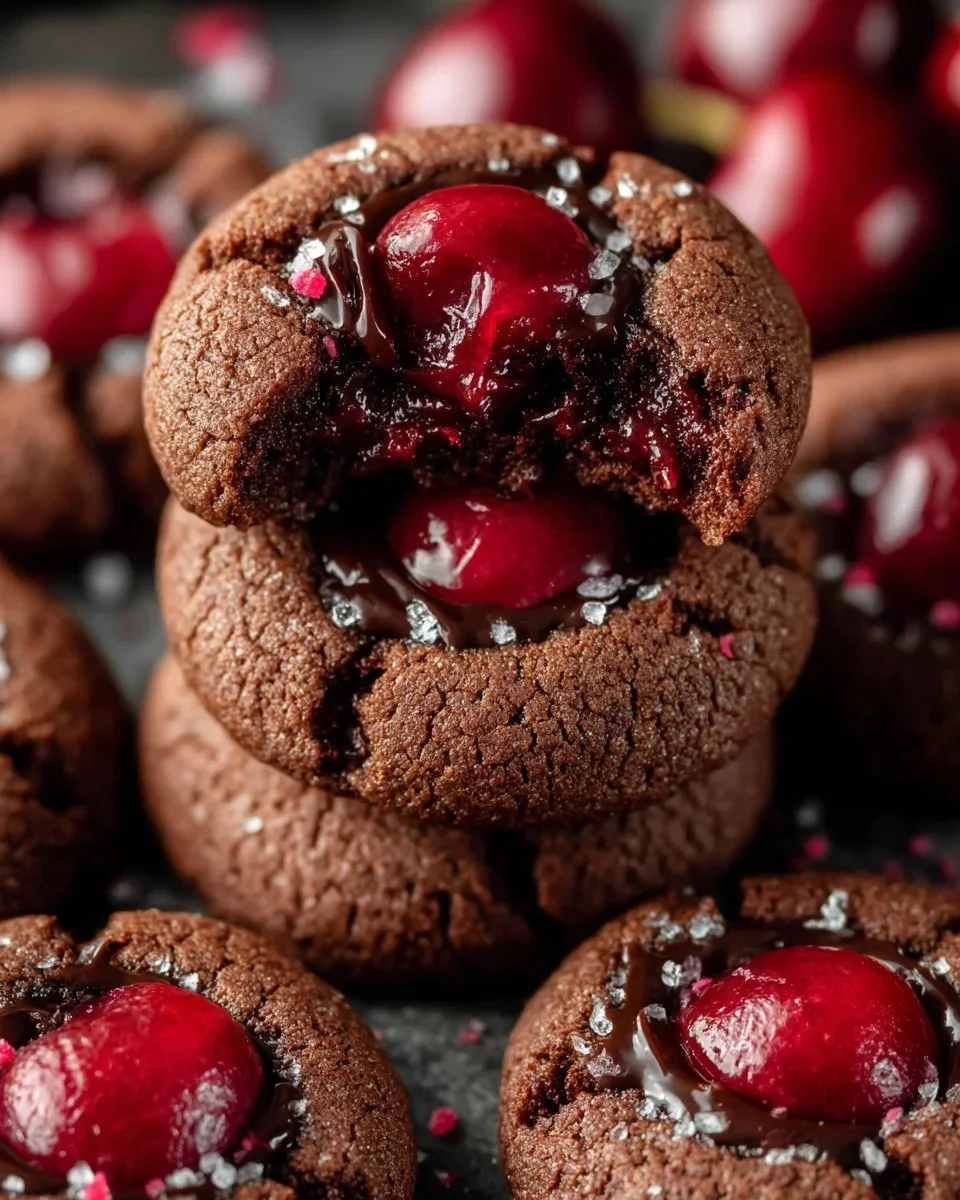
These chocolate cherry thumbprint cookies combine a tender chocolate shortbread with a glossy cherry filling — a nostalgic cookie that feels special but is easy to make. I’ve baked them dozens of times for holiday trays and weeknight treats, and they always disappear first. My tests focused on getting the thumbprint well-shaped and the filling glossy without being runny.
Why Make This Recipe
- Rich chocolate shortbread meets tart-sweet cherry preserves for a balanced, crowd-pleasing bite.
- They store and freeze well, so you can make a batch ahead for holidays or gifts.
- Simple ingredients and straightforward technique make this recipe approachable for home bakers.
- The cookies are visually attractive — perfect for cookie swaps, parties, or gifting in tins.
- Personally, I love these because the cherry preserves cut through the chocolate richness and keep each cookie bright and not overly sweet. For another take on chocolate-cherry cookies, check this variation: Chocolate Cherry Cookies.
Recipe Overview
- Prep time: 20 minutes (plus 30 minutes chilling)
- Cook time: 10–12 minutes per batch at 350°F (175°C)
- Total time: about 1 hour (including chilling)
- Servings: about 24 cookies
- Difficulty: Easy–Medium
- Method: Make a chocolate shortbread dough, shape into balls, press thumbprints, bake briefly, and fill with cherry preserves or quick cherry jam.
My Experience Making This Recipe
When I first made these, the thumbprints spread too much; chilling the dough for 30 minutes fixed that without changing texture. I also experimented with different cherry fillings and found that seedless preserves or a quick stovetop cherry compote give the cleanest, most attractive centers.
How to Make Chocolate Cherry Thumbprint Cookies
Start by creaming 1 cup (226 g) unsalted butter with 2/3 cup (130 g) granulated sugar until light, then beat in 1 large egg and 1 tsp vanilla. Whisk together 1 3/4 cups (220 g) all-purpose flour, 1/3 cup (35 g) unsweetened cocoa powder, and 1/2 tsp salt, then fold into the butter mixture until just combined. Chill dough for 30 minutes, then roll into 1-inch balls, place on a baking sheet lined with parchment or a silicone mat, and press centers with the back of a 1/2 teaspoon or the handle of a wooden spoon to make a shallow well. Bake at 350°F (175°C) for 10–12 minutes until edges set but centers are soft. While warm, re-press any shallow wells; then cool 5 minutes on the sheet before transferring to a rack. Fill each thumbprint with about 1/2 teaspoon seedless cherry preserves (or warm compote) once cookies are completely cool.
Equipment notes: use a stand mixer or electric hand mixer, a cookie scoop (1-inch) for uniform cookies, and a baking sheet with parchment or a silicone mat for even browning.
Expert Tips for Success
- Chill the dough: 30 minutes in the fridge prevents excess spreading and keeps the thumbprint shape.
- Use seedless cherry preserves or strain small compotes to avoid seeds and a runny texture.
- Press the thumbprint after baking if the well puffs up; do this gently while cookies are warm.
- Weigh flour if possible: 220 g (1 3/4 cups) yields consistent texture; spoon-and-level if using cups.
- Bake on the middle rack and rotate the sheet halfway to ensure even baking and prevent over-browning.
How to Serve Chocolate Cherry Thumbprint Cookies
- Arrange on a festive platter dusted lightly with powdered sugar for holiday parties.
- Pair with strong coffee or a fruity tea to balance the chocolate richness.
- Box them in parchment-lined tins as homemade gifts; add a sprig of rosemary for a seasonal touch.
- Serve alongside other cookies of differing textures (chewy, crispy) to create contrast on a dessert table.
Storage and Reheating Guide
Store cooled cookies in an airtight container at room temperature for up to 4 days. For longer storage, freeze in a single layer on a tray until firm, then transfer to a freezer-safe bag for up to 3 months; place parchment between layers to prevent sticking. Thaw at room temperature for 30–60 minutes; avoid microwaving filled thumbs—if you want warm filling, briefly warm preserves before spooning into cooled cookies. Re-crisp slightly by warming 4–6 cookies on a baking sheet at 300°F (150°C) for 4–6 minutes.
Recipe Variations
- Gluten-free: Substitute a 1:1 gluten-free baking flour blend (check xanthan gum content) and chill dough slightly longer for handling.
- Dairy-free: Use 1 cup (226 g) solid coconut oil or vegan butter and ensure chocolate/cocoa and preserves are dairy-free.
- Extra fudgy: Add 2 tablespoons of melted dark chocolate or increase cocoa to 1/2 cup while slightly reducing flour for a more brownie-like base.
- Almond-cherry: Add 1/2 teaspoon almond extract and top with slivered toasted almonds for crunch and nutty depth.
Nutritional Highlights
- Cherries add vitamin C and antioxidants (anthocyanins) that brighten the flavor and offer micronutrients.
- Using dark cocoa and moderate sugar means each cookie is a treat-sized portion; enjoy 1–2 cookies as a reasonable serving.
- Allergen info: contains wheat, eggs, and dairy unless swapped; also may contain nuts if you add almond variations. Adjust for dietary needs using the variation swaps above.
Troubleshooting Common Issues
- Cookie spreads too much: Chill dough 30–60 minutes and make sure butter isn’t too soft; also avoid over-greasing the pan.
- Thumbprints vanish during baking: Make the indent slightly deeper before baking and re-press immediately when cookies come out of the oven.
- Filling runs out or becomes shiny and thin: Use thicker seedless preserves or gently simmer fresh cherries with a teaspoon of cornstarch to thicken, cool slightly, then fill.
Frequently Asked Questions
Q: Can I use fresh cherries instead of preserves?
A: Yes. Pit and halve 1 1/2 cups fresh cherries, simmer with 2–3 tablespoons sugar and 1 tsp lemon juice until they release juices. To thicken, stir in 1/2 teaspoon cornstarch mixed with a little water and simmer 1–2 minutes. Cool completely before spooning into cookies.
Q: How do I make the cookie centers glossy and smooth?
A: Use seedless preserves or a strained compote and warm it slightly before filling so it settles into a glossy surface. Don’t overfill; 1/2 teaspoon per cookie is usually right.
Q: Can I freeze already-filled cookies?
A: It’s best to freeze unfilled baked cookies to avoid soggy centers. Freeze unfilled cookies flat, then fill after thawing. If you must freeze filled cookies, do so for short periods and place parchment between layers.
Q: How do I get consistent cookie size and uniform baking?
A: Use a 1-inch cookie scoop for uniform balls and weigh dough if you want precision. Space cookies 2 inches apart, and bake on a middle rack, rotating pans halfway through for even color.
Conclusion
For more recipe ideas and similar takes on this classic, check these helpful versions: Chocolate Cherry Thumbprint Cookies – If You Give a Blonde a …, Chocolate Cherry Thumbprint Cookies | 3 Yummy Tummies, Chocolate Cherry Thumbprint Cookies – Julie’s Eats & Treats ®, Chocolate Cherry Thumbprint Cookies with Fudge Icing – Granny’s …, Chocolate Cherry Thumbprint Cookies Recipe – Happy Foods Tube
Print
Chocolate Cherry Thumbprint Cookies
- Total Time: 60 minutes
- Yield: 24 cookies
- Diet: Vegetarian
Description
These chocolate cherry thumbprint cookies combine a tender chocolate shortbread with a glossy cherry filling, making them a nostalgic treat that’s perfect for the holidays.
Ingredients
- 1 cup (226 g) unsalted butter
- 2/3 cup (130 g) granulated sugar
- 1 large egg
- 1 tsp vanilla extract
- 1 3/4 cups (220 g) all-purpose flour
- 1/3 cup (35 g) unsweetened cocoa powder
- 1/2 tsp salt
- Seedless cherry preserves (for filling)
Instructions
- Cream the butter and sugar until light.
- Beat in the egg and vanilla.
- Whisk together flour, cocoa powder, and salt; fold into the butter mixture until just combined.
- Chill the dough for 30 minutes.
- Roll into 1-inch balls and place on a baking sheet.
- Press centers with a spoon to make a well.
- Bake at 350°F (175°C) for 10–12 minutes.
- Re-press any wells after baking; cool before filling with cherry preserves.
Notes
For best results, chill the dough to prevent excess spreading. Use seedless preserves for a clean filling.
- Prep Time: 20 minutes
- Cook Time: 12 minutes
- Category: Dessert
- Method: Baking
- Cuisine: American