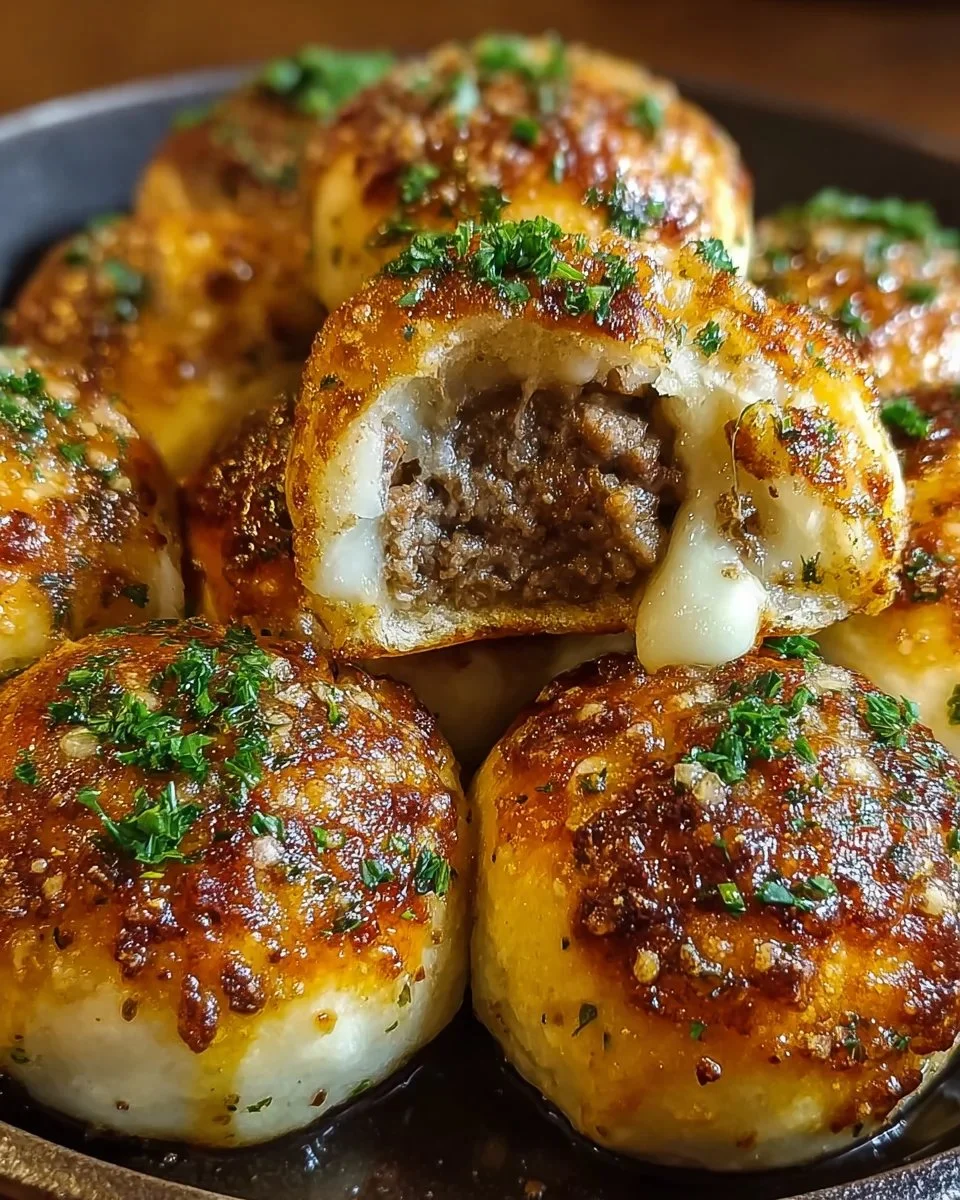
These Garlic Parmesan Cheeseburger Bombs are little pockets of melty cheese, seasoned beef, and garlic-butter pastry that taste like a cheeseburger in every bite. I make them when I want party food that’s fast to assemble and always disappears first. If you like flavor-packed handhelds, check out this twist on a similar idea: Big Mac Cheeseburger Bombs.
Why Make This Recipe
- They deliver cheeseburger flavor in a convenient, handheld form that’s kid-friendly and party-ready.
- These bites come together quickly—most of the work is assembly—so they’re great for weeknight dinners or game day.
- You get protein and calcium from beef and cheese, and portion control is easy with individual bombs.
- They freeze and reheat well, making them a handy make-ahead option for busy households.
- Personal insight: I love this recipe because the garlic-parmesan butter brushed on top turns simple dough into something restaurant-worthy with almost no extra effort; try this creamy garlic-parmesan chicken if you’re a garlic-parmesan fan.
Recipe Overview
Prep time: 15 minutes.
Cook time: 15–18 minutes at 400°F (205°C).
Total time: ~35 minutes including short assembly and resting.
Servings: Makes about 18–24 bombs depending on size.
Difficulty: Easy — basic mixing, filling, and baking.
Method: Brown seasoned ground beef in a skillet, fill pre-rolled dough or biscuit rounds with meat and cheese, seal, brush with garlic-parmesan butter, and bake on a parchment-lined sheet until golden.
My Experience Making This Recipe
I tested this recipe several times to nail the seal and the right oven temperature so the dough bakes through without burning the butter topping. Early tests had cheese leakage, so I learned to use chilled fillings and a tight pinch-seal to keep the bombs intact. Using an instant-read thermometer helped ensure the center reached a safe 160°F (71°C) for ground beef.
How to Make Garlic Parmesan Cheeseburger Bombs
Start by browning 1 lb (450 g) ground beef with 1/2 tsp salt, 1/4 tsp black pepper, 1 tsp garlic powder, and 1 tbsp Worcestershire sauce; drain excess fat. Roll out 1 can (or a 16-oz tube) of biscuit dough or use pizza dough and cut into 18–24 rounds, then place about 1 tbsp warm beef and a cube or 1 tbsp shredded cheddar in each round. Seal edges tightly, place seam-side down on a parchment-lined baking sheet, and brush with a mixture of 3 tbsp melted butter, 1 clove minced garlic, and 2 tbsp grated Parmesan. Bake at 400°F (205°C) for 15–18 minutes until golden and the internal temp reads 160°F (71°C). Let rest 3–5 minutes before serving so the cheese sets slightly.
Expert Tips for Success
- Use chilled filling: Cool the browned beef slightly in the fridge (10–15 minutes) so the dough doesn’t become soggy and the cheese doesn’t melt through before sealing. Also consider a quick sear for better Maillard flavor.
- Seal well: Moisten dough edges with a dab of water or beaten egg and press firmly; a fork crimp or twisting seal prevents leaks. A silicone baking mat or parchment prevents sticking.
- Control moisture: Drain or blot excess grease from the beef; too much liquid makes a soggy bottom. Use a paper towel-lined sieve or brown in a cold pan to render less fat.
- Equipment choice: Use an instant-read thermometer to check 160°F (71°C) internal temp for safety. A rimmed baking sheet helps catch any drips and oven-safe cooling racks encourage even browning.
- Even baking: Rotate the pan halfway through baking and use an oven thermometer to confirm your oven hits 400°F (205°C) for consistent results. If tops brown too fast, tent loosely with foil for the last 3–5 minutes.
(Also great with other garlic-parmesan recipes like this stuffed spaghetti squash when you want a vegetable side.)
How to Serve Garlic Parmesan Cheeseburger Bombs
- Serve warm with dipping sauces like ketchup, mustard, or a quick garlic aioli (mix 1/2 cup mayo, 1 tsp lemon, 1/2 tsp garlic powder).
- Turn them into sliders: split horizontally and add lettuce and pickles for a mini sandwich presentation. For a potato side, pair with crispy garlic-parmesan duchess potatoes.
- Presentation tip: Arrange bombs in a circle on a wooden board, brush extra butter, and sprinkle chopped parsley and extra grated Parmesan for color. Great for game days, potlucks, or casual dinners.
Storage and Reheating Guide
Refrigerate cooled bombs in an airtight container for up to 3 days. For longer storage, freeze on a tray until solid, then transfer to a freezer-safe bag for up to 3 months. Reheat from refrigerated: place on a baking sheet and warm at 350°F (175°C) for 8–10 minutes until heated through. From frozen: bake at 375°F (190°C) for 18–22 minutes, tenting with foil if the top browns too fast. Avoid microwaving from frozen if you want to preserve crispness; if using a microwave, reheat on medium power in 30-second bursts and crisp in a hot oven for a few minutes.
Recipe Variations
- Gluten-free: Use gluten-free biscuit dough or store-bought gluten-free pizza dough and confirm all seasonings are GF. Bake times are similar; check color and temperature.
- Dairy-free: Swap cheddar for a dairy-free melting cheese and use olive oil instead of butter for brushing, mixing in 1/2 tsp garlic powder and 1 tbsp nutritional yeast for savory flavor.
- Lean or white meat: Substitute ground turkey or chicken; add a tablespoon of olive oil when browning to add fat and flavor, and ensure internal temp reaches 165°F (74°C).
- Spicy or gourmet: Add diced pickled jalapeños to the filling or swap cheddar for pepper jack; for an upscale version, fold a thin pickle slice and caramelized onion into the filling.
Nutritional Highlights
Each bomb is a protein-rich handheld—roughly 150–250 calories depending on dough choice and cheese amount. They provide a good source of protein and calcium from beef and cheese but can be high in sodium and saturated fat; keep portions to 2–3 bombs for balanced intake. Allergens: contains dairy and wheat (unless you use alternatives), and may contain eggs depending on dough brand, so check labels for people with allergies.
Troubleshooting Common Issues
- Problem: Bombs leak cheese or burst open. Solution: Use chilled filling, avoid overfilling, and seal edges with water or egg wash plus a fork crimp.
- Problem: Bottoms are soggy. Solution: Drain beef very well, preheat the baking sheet in the oven for a minute before placing bombs, and bake on parchment with a rimmed sheet to allow airflow.
- Problem: Tops brown before centers finish. Solution: Lower oven to 375°F (190°C) and bake a few minutes longer or tent loosely with foil to slow browning.
Frequently Asked Questions
Q: Can I make these ahead and bake later?
A: Yes — assemble bombs and place them on a parchment-lined tray, cover tightly, and refrigerate up to 24 hours before baking. For longer storage, freeze solid on the tray, then bag for up to 3 months and bake from frozen at 375°F (190°C) for 18–22 minutes.
Q: What dough works best?
A: Flaky biscuit dough (16-oz tube) is fast and gives a tender crust; pizza dough yields a chewier, more bread-like shell. For the crispiest bottom, use a preheated rimmed baking sheet or a pizza stone set on the oven rack.
Q: How do I keep the flavor balanced without it getting too greasy?
A: Brown meat over medium-high heat and drain excess fat, then return to pan and add a touch of Worcestershire and finely diced onion for depth without extra grease. Brushing with garlic-parmesan butter adds flavor; use just enough to coat lightly.
Q: Can I make them vegetarian?
A: Absolutely — swap the beef for seasoned cooked lentils or a plant-based ground meat alternative, adjust seasonings (add 1 tsp soy sauce or Worcestershire-style seasoning), and proceed the same way. Use dairy-free cheese if needed.
Conclusion
If you want a fast, crowd-pleasing appetizer that tastes like a garlic-parmesan cheeseburger in one bite, try the full recipe guide here: Irresistible Garlic Parmesan Cheeseburger Bombs in 30 Minutes.

Garlic Parmesan Cheeseburger Bombs
- Total Time: 35 minutes
- Yield: 18-24 servings
- Diet: Omnivore
Description
These Garlic Parmesan Cheeseburger Bombs are little pockets of melty cheese, seasoned beef, and garlic-butter pastry that deliver cheeseburger flavor in a convenient, handheld form.
Ingredients
- 1 lb (450 g) ground beef
- 1/2 tsp salt
- 1/4 tsp black pepper
- 1 tsp garlic powder
- 1 tbsp Worcestershire sauce
- 1 can (or 16-oz tube) biscuit dough or pizza dough
- 1 tbsp shredded cheddar cheese per bomb
- 3 tbsp melted butter
- 1 clove minced garlic
- 2 tbsp grated Parmesan cheese
Instructions
- Brown the ground beef in a skillet with salt, black pepper, garlic powder, and Worcestershire sauce. Drain excess fat.
- Roll out the biscuit or pizza dough and cut into 18–24 rounds.
- Place about 1 tbsp warm beef and a cube or 1 tbsp shredded cheddar cheese in each round.
- Seal the edges tightly, place seam-side down on a parchment-lined baking sheet.
- Brush with a mixture of melted butter, minced garlic, and grated Parmesan.
- Bake at 400°F (205°C) for 15–18 minutes until golden and the internal temperature reaches 160°F (71°C).
- Let rest for 3–5 minutes before serving.
Notes
Use chilled filling to prevent soggy dough. A tight pinch-seal and proper browning will help avoid leakage.
- Prep Time: 15 minutes
- Cook Time: 18 minutes
- Category: Appetizer
- Method: Baking
- Cuisine: American