I’ve been making festive cake bites for years, and these Ultimate Little Debbie Christmas Tree Cake Balls are a dependable, crowd-pleasing holiday treat. They turn store-bought Christmas tree cakes into bite-sized, decorated trees that are fast to make and impossible to resist. I’ve tested shaping and coating techniques to get glossy greens and clean decorations every time — and I’ll share those tricks below.
Why Make This Recipe
- Fast and convenient: uses store-bought Little Debbie Christmas Tree Cakes so you skip baking and still get a homemade feel. See a similar riff on these treats here: Little Debbie Christmas Tree Cake Truffles.
- Big holiday payoff: festive look with minimal effort — perfect for cookie swaps, school parties, or last-minute trays.
- Kid-friendly decorating: kids can help roll, dip, and sprinkle, making this a fun family activity.
- Consistently tasty: creamy cream cheese centers with sweet chocolate coatings give great texture contrast.
- Personal note: I love this recipe because it lets me get creative with decorations while keeping prep time under an hour.
Recipe Overview
- Prep time: 20 minutes active + 30 minutes chilling
- Cook time: none
- Total time: about 50–60 minutes (including chilling)
- Servings: 24 cake balls (depends on size)
- Difficulty: Easy
- Method: crumble cakes, mix with cream cheese, shape into tree cones, chill, dip in melted candy coating, decorate.
My Experience Making This Recipe
The first time I made these I struggled with soft centers that made dipping messy; chilling the shaped trees for at least 30 minutes fixed that. I also found using a small offset spatula and a toothpick made glazing and decorating far neater.
How to Make Ultimate Little Debbie Christmas Tree Cake Balls
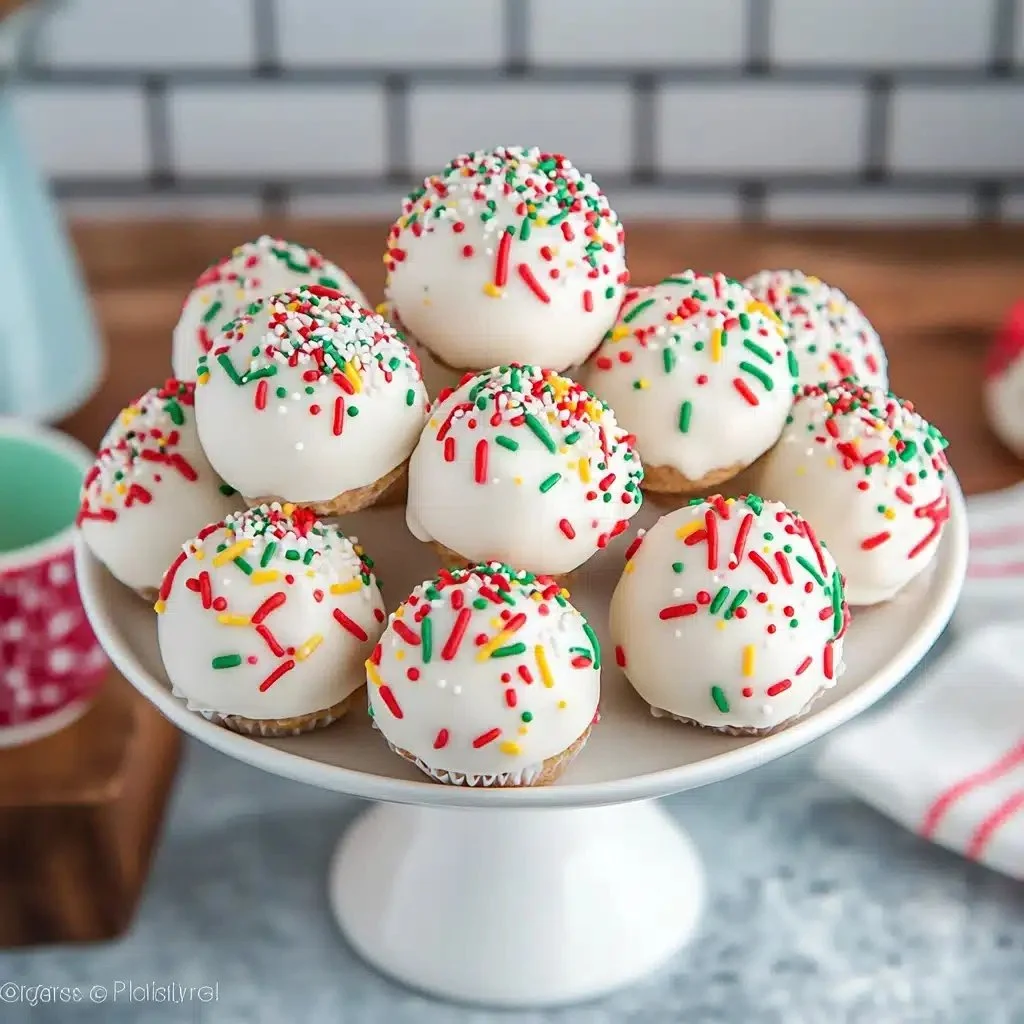
Crumble the Little Debbie cakes in a bowl or food processor, then fold in softened cream cheese (usually 8 oz per 10–12 cakes) until you get a moldable mixture. Shape into small cone or tree-like forms by hand, press a small pretzel stick into the base if you want a “trunk,” and chill until firm. Melt white chocolate or candy melts, tint green, dip or drizzle the chilled trees, and add sprinkles while the coating is wet. Expect to work quickly with the coating — keep the melts at a warm but not hot temperature to stay fluid.
Expert Tips for Success
- Use room-temperature (soft) but not melted cream cheese: too cold and it won’t mix, too warm and the centers get too soft to shape.
- Chill well: place shaped trees on a parchment-lined baking sheet and chill for 30–60 minutes; if dipping still is difficult, freeze 10–15 minutes to firm up.
- Melt coatings gently: microwave in 20–30 second bursts stirring between each; keep white chocolate under 110°F (43°C) to avoid seizing. A candy thermometer helps.
- Thin coatings carefully: if your candy melts are too thick, thin with 1 teaspoon of vegetable oil or coconut oil at a time until you get a smooth flow.
- Use a dipping fork and parchment: a two-pronged dipping fork or toothpick helps remove excess coating and keeps shapes intact; set on parchment to cool.
(If you like festive baked desserts to serve alongside these bites, try a cranberry-orange bundt that plays well at holiday tables: cranberry orange bundt cake.)
How to Serve Ultimate Little Debbie Christmas Tree Cake Balls
- Party platter: arrange on a parchment-lined tray with green paper doilies and sprinkle “snow” (powdered sugar) around for visual pop.
- Dessert board: pair with salted nuts, chocolate candies, and fresh fruit for contrast.
- Gift idea: place in cellophane bags, tie with ribbon, and include a small label for neighbor or teacher gifts.
- Kid-friendly station: set out sprinkles, nonpareils, and edible pearls for kids to decorate; for themed ideas, see simple kid treat projects like cute spooky spider lollipops for inspiration.
Storage and Reheating Guide
- Refrigerator: store finished cake balls in an airtight container for up to 5 days. Layer with parchment to prevent sticking.
- Freezer: freeze on a tray until solid (about 1–2 hours), then transfer to an airtight freezer container for up to 3 months. Thaw in the refrigerator overnight.
- Do not microwave coated balls to “reheat.” If the coating sweats after thawing, let them sit in the fridge 30–60 minutes; if you want to refresh the gloss, very gently warm the coating with low heat (or use a warm hair dryer at a distance) and smooth with an offset spatula.
Recipe Variations
- Gluten-free: use gluten-free store-bought cake or make the cake base from a gluten-free cake mix, then follow the same method.
- Dairy-free: swap in a dairy-free cream cheese (8 oz equivalent) and use dairy-free candy melts; check ingredient labels for compatibility.
- Chocolate lovers: mix in 2–3 tablespoons cocoa powder to the cake-cream cheese mix for a chocolate center, or coat in dark chocolate instead of green.
- Fancy finish: pipe royal icing garlands or use melted colored chocolate for tidy stripes; add crushed peppermint for a minty finish.
(If you enjoy comforting, creamy desserts you can make ahead for gatherings, you might also like this creamy kheer recipe: creamy kheer.)
Nutritional Highlights
- These cake balls are an indulgent treat with higher sugar and fat content — enjoy in small portions (1–2 per person).
- Allergen note: contains dairy (cream cheese, possibly milk in cake and coatings), wheat (cakes), and soy (many candy melts or coatings). If you add nuts, add tree-nut allergen.
- If you need lower-sugar options, consider using a lower-sugar cake base and dark chocolate coating.
Troubleshooting Common Issues
- Centers too soft when dipping: solution — chill or freeze the shaped trees until firm (30–60 minutes fridge or 10–20 minutes freezer).
- Coating cracking or dull: avoid sudden temperature changes; bring cake balls to fridge temperature gradually and keep coating at a steady warm temperature (use a warm water bath if needed).
- White chocolate seizing: seize happens if moisture or overheating occurs — stop microwaving, add a small amount (1–2 tsp) of neutral oil and stir vigorously, or start over with fresh melts and keep them dry.
(For savory party mains that pair well with make-ahead desserts, consider a simple casserole — a good example is a hearty chicken spaghetti casserole: creamy chicken spaghetti casserole.)
Frequently Asked Questions
Q1: Can I use a food processor to crumble the cakes?
A1: Yes — pulse cakes in a food processor for 5–10 quick pulses to get fine crumbs. Avoid over-processing into a paste; stop as soon as crumbs form.
Q2: How many cakes and how much cream cheese do I need?
A2: A reliable ratio is about 10–12 Little Debbie Christmas Tree Cakes to 8 ounces (1 package) of softened cream cheese to make ~24 medium-sized truffles. Adjust slightly for size preference.
Q3: How do I get a smooth, glossy coating?
A3: Keep your coating at a warm, even temperature and thin as needed with a teaspoon of vegetable or coconut oil. Use a dipping fork and tap off excess before setting on parchment to reduce drips.
Q4: Can I prepare these a day ahead?
A4: Absolutely. Make and fully cool them, then store in an airtight container in the refrigerator up to 5 days. For best texture, bring to room temperature 10–15 minutes before serving.
Conclusion
If you want an easy, festive, no-bake treat that looks special but takes minimal time, these Ultimate Little Debbie Christmas Tree Cake Balls are a perfect holiday pick. For an alternate take and step-by-step photos, check this related recipe guide: Christmas Tree Cake Balls – Life With The Crust Cut Off.
Print
Ultimate Little Debbie Christmas Tree Cake Balls
- Total Time: 60 minutes
- Yield: 24 cake balls
- Diet: Vegetarian
Description
Festive no-bake cake balls made from store-bought Little Debbie Christmas Tree Cakes, perfect for holiday gatherings.
Ingredients
- 10-12 Little Debbie Christmas Tree Cakes
- 8 oz cream cheese, softened
- White chocolate or candy melts
- Green food coloring (optional)
- Pretzel sticks (optional, for trunk)
- Sprinkles (for decoration)
- Vegetable oil or coconut oil (if needed to thin coating)
Instructions
- Crumble the Little Debbie cakes in a bowl or food processor, then fold in softened cream cheese until a moldable mixture forms.
- Shape into small cone or tree-like forms by hand, inserting a pretzel stick into the base if desired, and chill until firm (30-60 minutes).
- Melt white chocolate or candy melts, tint with green, and dip or drizzle the chilled trees, adding sprinkles while the coating is wet.
- Allow to cool on parchment paper until the coating sets.
Notes
Chill the shaped trees well for easier dipping and smoother coating. Use tips for melting and thinning coatings carefully to achieve the best results.
- Prep Time: 20 minutes
- Cook Time: 0 minutes
- Category: Dessert
- Method: No-Bake
- Cuisine: American